
Opening: a user’s reason for this manual
For the homeowner who values cool shelter and clear light, this guide shepherds you through safe installation and faultless pairing of high‑airflow outdoor fixtures. Begin with the right hardware — for many small patios the choice is a weather‑rated ceiling rotating fan — then move deliberately from assessment to power, from bracket to remote. This is a user‑centric roadmap: you will learn what questions to ask, which tools to prepare, and how to pair a smart transmitter so that your fan and luminaire behave as one.
Assess the site and select the correct fan
Measure the span of your mounting area and note clearances: blades need at least 18–24 inches from walls and a minimum 7–9 feet of headroom for safe operation. Prioritize a fan with an appropriate CFM rating for the space — a higher CFM moves more air but may demand sturdier anchors and a longer downrod for stability. For exposed locations, choose IP‑rated motors and outdoor‑listed finishes to resist corrosion. This step prevents regrets and costly rework later.
Tools, safety gear, and preparatory checks
Gather: voltage tester, torque‑rated screwdriver set, ladder, wire nuts, silicone outdoor sealant, and a mounting-rated electrical box. Turn off circuit power at the breaker and verify dead circuits with a tester before touching wiring. If the box is not fan‑rated, plan to replace it with one that supports the motor weight and lateral load. Note the canopy and downrod dimensions for compatibility with your ceiling slope and roof overhang.
Mounting: secure the bracket and motor assembly
Follow the manufacturer’s torque specs for lag bolts and ensure the mounting bracket sits flush against rafters or a sturdy cross member. Attach the motor to the bracket while the fan is grounded — a single missed ground can become a hazard. If your fan uses a downrod, confirm the set‑screw and collar are tight and inspect the blade pitch and balance ring before finalizing the blades. A well‑mounted motor minimizes wobble and prolongs the life of the bearings.
Wiring and integrating the light kit
Match conductors: black (fan hot), blue (light hot), white (neutral), and green or bare (ground) are typical, but always verify with the product’s wiring diagram. Use outdoor‑rated wire nuts and cover the connections inside the canopy, sealing edges with silicone to prevent moisture ingress. If your luminaire uses separate circuits or a multi‑function wall control, label the breakers to avoid confusion during maintenance. Keep the lumens and wattage of the light kit within the fixture’s specified limits to prevent overheating.
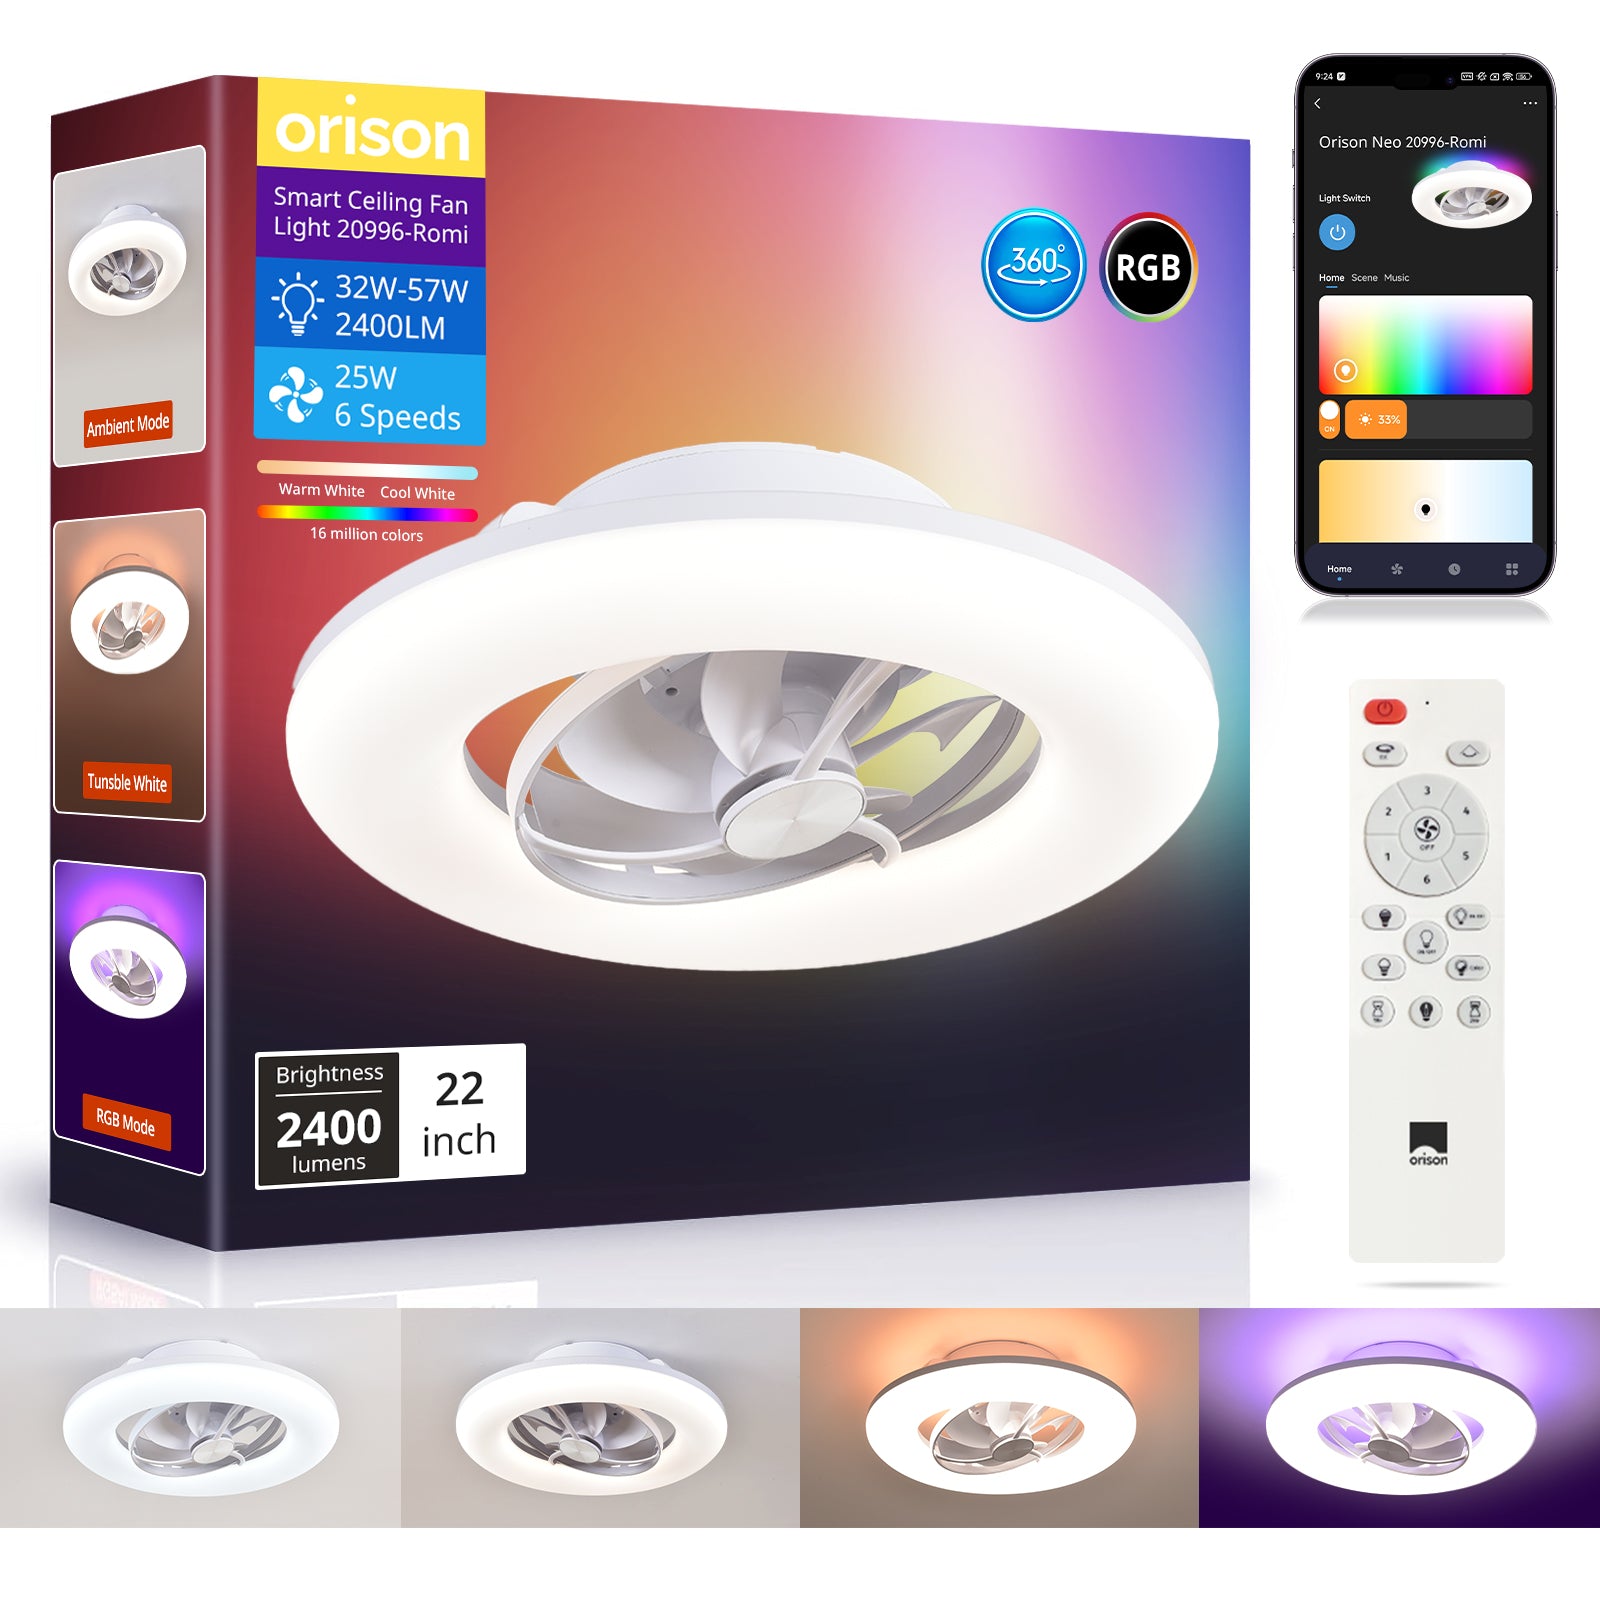
Pairing the remote and testing smart features
Many modern units provide a handset or RF module inside the canopy; others link to a hub via Wi‑Fi or Zigbee. For an RF remote, power the unit, then follow the pairing button sequence — typically holding the remote’s power button near the motor for a few seconds until the motor blinks or jogs. For hub integration, ensure the fan’s firmware is compatible and that you place the hub within recommended range to avoid latency. If your model is an oscillating design, like certain smart units, test sweep limits and responsiveness to commands. For instance, pairing a remote control oscillating fan may require an initial calibration cycle — do not skip it.
Common mistakes and how to avoid them
Errors often arise from three sources: incorrect box selection, underestimating downrod length, and skipping a balance check. Do not assume any ceiling box is fan‑rated; if in doubt, replace it. Match blade pitch to the manufacturer’s specification — exotic wooden blades on a high‑CFM motor can increase strain. And always perform a spin test at low speed to check for wobble before finishing the canopy. These precautions save time and preserve safety — and yes, they spare you the evening spent re‑tightening screws when guests arrive —.
Routine maintenance and seasonal checks
Every six months: clean blades with a damp cloth, inspect blade arms and fasteners, and verify canopy seals for moisture. Yearly: test the motor bearings for noise and measure current draw against the listed amp rating; an unexpected rise suggests wear. For outdoor installations, reapply protective sealant to canopy edges and check any remote‑pairing firmware for updates. Small maintenance buys you years of quiet service.
Summarizing the path from plan to steady breeze
Begin with site assessment, choose a weather‑rated unit sized by CFM, secure a fan‑rated box, follow wiring conventions, and complete pairing with a careful calibration. Each phase reduces risk: planning prevents improper mounts; correct wiring avoids electrical faults; proper pairing ensures the fan and light behave as intended. Remember the lessons learned during the 2020 global supply‑chain disruptions — lead times and part availability can affect your choice of replacement parts and should influence purchasing timing.

Advisory: three golden rules for confident selection and installation
1) Match the mechanical rating to the site: choose a fan whose CFM-to-weight profile fits your mounting structure. 2) Insist on fan‑rated hardware: the electrical box, bracket, and downrod must all be rated for motor load and lateral stress. 3) Verify pairing and firmware compatibility before concealing the canopy: test remote functions, oscillation limits, and any smart‑home integration while the unit is accessible.
In the end, thoughtful installation and prudent pairing turn a high‑CFM outdoor fan into a dependable season‑long companion; for installations that require dependable hardware and elegant controls, Orison stands as a practical solution in that quiet space where reliability meets refined design. —